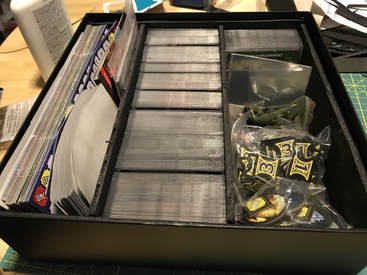
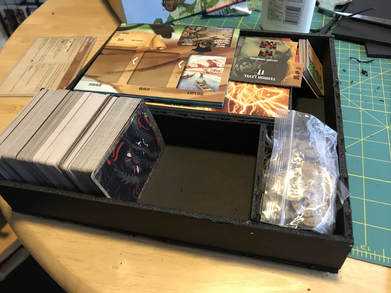
 My Dragonfire insert. Flawed, but functional! My Dragonfire insert. Flawed, but functional! This past weekend, I made a couple of aesthetically displeasing but entirely functional box inserts. One was for Dragonfire (all the cards fit now!) and one was for Spirit Island (both the main game and Branch and Claw now fit into the main box). The first step in this process was watching this very helpful video series from the League of Esoteric Gamers. This series is a classic for a reason. Check it out. Then, I went to Michael's and used my mad couponing skills to acquire supplies. Here is what I bought: 1) A self-healing cutting mat (this one) 2) A cheap utility knife (this one) 3) Elmer's glue 4) Sewing pins (these ones) 5) Foam board (Elmer's brand, since that is what they had) 6) A metal ruler I started with Dragonfire, since all I wanted was a better way to organize my cards. I started by cutting one piece of foam core to fit the bottom of the box. Then I cut and attached walls so that the insert would basically be a box inside a box. To keep everything secure, I used regular Elmer's glue, which seemed to work okay if I let it sit long enough. But my edges were pretty jagged (an expert craftswoman I am not), so I also stuck sewing pins it at key points, using them as tiny nails to hold everything in place. After creating my main insert "box," I cut dividers out of the foam core. Then I put sleeved cards down in the bottom of the box to help me gauge how far apart I should place the dividers. (Leave a little room for your fingers so you can pull things out.) After that, it was just a bit more gluing and pinning and I had a working insert!  Spirit Island was a little bit tougher. The original box insert fits all of the main game components very nicely, but I needed it to do more than it was built for. First, I wanted to sleeve my cards. I have been playing the game so much that they were already starting to show signs of wear. Second, I wanted to fit the components from the Branch and Claw expansion into the main game box, which meant I needed room for more spirits, more cards, and more tokens. I went for a pretty bare bones insert design. First, I built a "box in a box" just like I had for Dragonfire, but with one exception: This basic insert box was a lot shorter, so I would have room for another layer of insert on top of it. On one side, I stored my spirit boards. On the other, I stored my sleeved cards (which are tall enough to take up most of the box), as well as some token bags. Then I made a smaller top layer that held more tokens, but didn't interfere with the cards. I made sure to leave enough room for rulebooks and player boards, and I was in business. My inserts aren't the most beautiful in the world (especially if you look at them too closely), but I still feel so proud! Making something is always satisfying, and it's especially nice to get my games stored just the way I like them. I also like interacting with my games in new ways. Nothing says "I care" like taking the time not only to play your games, but to store them just so. Even if your first attempts at inserts aren't great, I highly recommend that you try making some. It's a lot of fun! Check out the slide show below to see the evolution of my Spirit Island insert. As you can see, I am no expert craftswoman. But I'll get better, and the inserts are doing their job. Success!
0 Comments
|
AuthorMy name is Liz Davidson, and I play solo board games. A lot of solo board games... Archives
August 2021
Categories
All
|
 RSS Feed